Frontend System Design - Part 1
Designing Scalable Frontend Systems

The Front-end applications are getting more complex day by day. And not everyone got a chance to be involved in the architecture design and got to know the technical decisions the team took, the tradeoffs, design patterns, rendering patterns, performance patterns, and more.
Unlike distributed system design, there are very few front-end system design resources out there. And it is a substantial skill for every front-end developer to be able to talk about the design tradeoffs, possible implementations, API design, performance, etc.
Besides that, recently, most of the FAANG companies start adding front-end system design interviews as a part of their interview process for front-end roles.
In this series, We will walk through a framework I am using in solving front-end system design questions, after that, we will discuss a bunch of different design problems such as Facebook news feed, Pinterest, WhatsApp, Netflix Search Bar, Image Carousel, and more.
So without further ado, Let's get it started.
Foundations
[1] About System Design
The main target of the system design process is to be able to provide detailed information and definition of the system at a high level, its modules, architecture, components, interfaces, and data for the system based on the specified requirements.
[2] Types of Design Problems
There are two main types of front-end system design problems and questions:
[2.1] High-Level Design (Product Design)
High-Level Design aims to design a complete product from a-z such as WhatsApp, Netflix, and Facebook. You don't have to go deep into the lower level and you can keep the discussion at a higher level such as discussing the API design, Data entities, Component Architecture, etc.
[2.2] Low-Level Design (Component Design)
Low-Level Design aims to design a feature of a product such as a Netflix search bar, infinite scroll feed, Auto-complete dropdown, and so on. In this case, you have to go deep into the implementation details, discussing the corner cases, the rendering pattern, its performance, and more.
[3] Design Plan
An essential point to note before any system design interview is that most of the front-end system design interview questions aim to be vague, leaving you with a lot of room to explore. So the candidates should take the initiative and lead the conversation with the interviewer discussing all the different aspects of the system.
Based on that, we need to have a framework that we can use to set an outline for our system design discussion, which also would be very useful if you are working on a new feature or a new front-end project.
As shown below, our framework consists of ten core parts as follows, which will be different in their details based on whether we are discussing HLD or LLD design problems:
| Plan Items | |
| 1. Requirements Gathering | 2. Component Architecture |
| 3. Data Entities | 4. Data API |
| 5. API Design | 6. Data Store |
| 7. Performance Optimization | 8. Accessibility |
| 9. Testing Strategy | 10. Security |
[3.1] Requirements Gathering
The starting point of any system design discussion is the requirement-gathering step. in which we have to clarify all the details of the system starting from the basic problem statement and passing through all the functional and non-functional requirements.
Functional Requirements:
In functional requirements discussion, we have to understand everything about the system's behavior, features, limitations, and more. for example, if we are designing a newsfeed like the Facebook newsfeed, we can describe it as follows:
Infinite scrollable news feeds where stories appear based on the user subscriptions
Users can create posts, attach text, links, images, or videos
Users can comment on a post and attach images, links, images, or videos
Non-Functional Requirements:
In non-functional requirements discussion, we have to define the scope with the interviewer about anything not related to the core of the application or the component such as:
| Non-Functional Items | |
| Responsiveness | Performance |
| Browser Support | I18n |
| Localization | Testing Strategies |
| Offline Support | Security |
| Caching | A/B Testing |
| Accessibility | HTTP 2 / HTTP 3 |
| Client-Side or Server-Side Rendering | Mobile / Desktop |
Important Note:
Usually, this stage is left vague on purpose so, you have to take the initiative to clarify and ask about each point and each part of the system to make sure that you are on the same page with your interviewer.
A good point about the Component Design (LLD) is that most of the components have a well-defined scope, and most likely you have used such a component yourself.
[3.2] Component Architecture
The next step after getting all the functional and non-functional requirements is to start the componentization process. In componentization, we start by listing and breaking down our product or component into its subcomponents and submodules.
In componentization, we have two main points that have to showcase, the first one is the wireframe and the second one is the dependency graph.
Let's take the Facebook newsfeed as an example to show both of them. By a simple analysis of the Facebook newsfeed, we can break it into the following main three components (Post Card, Comment Input, and Comments List)
[1] Components Wireframe
As shown in the below image, this could be a starting point sketch for the system design of the Facebook newsfeed, then we can add more details or even focus on a specific area.
Important Note:
If we are designing an isolated component such as a feed or a widget, so it would be better to zoom in on it and only focus on its details.
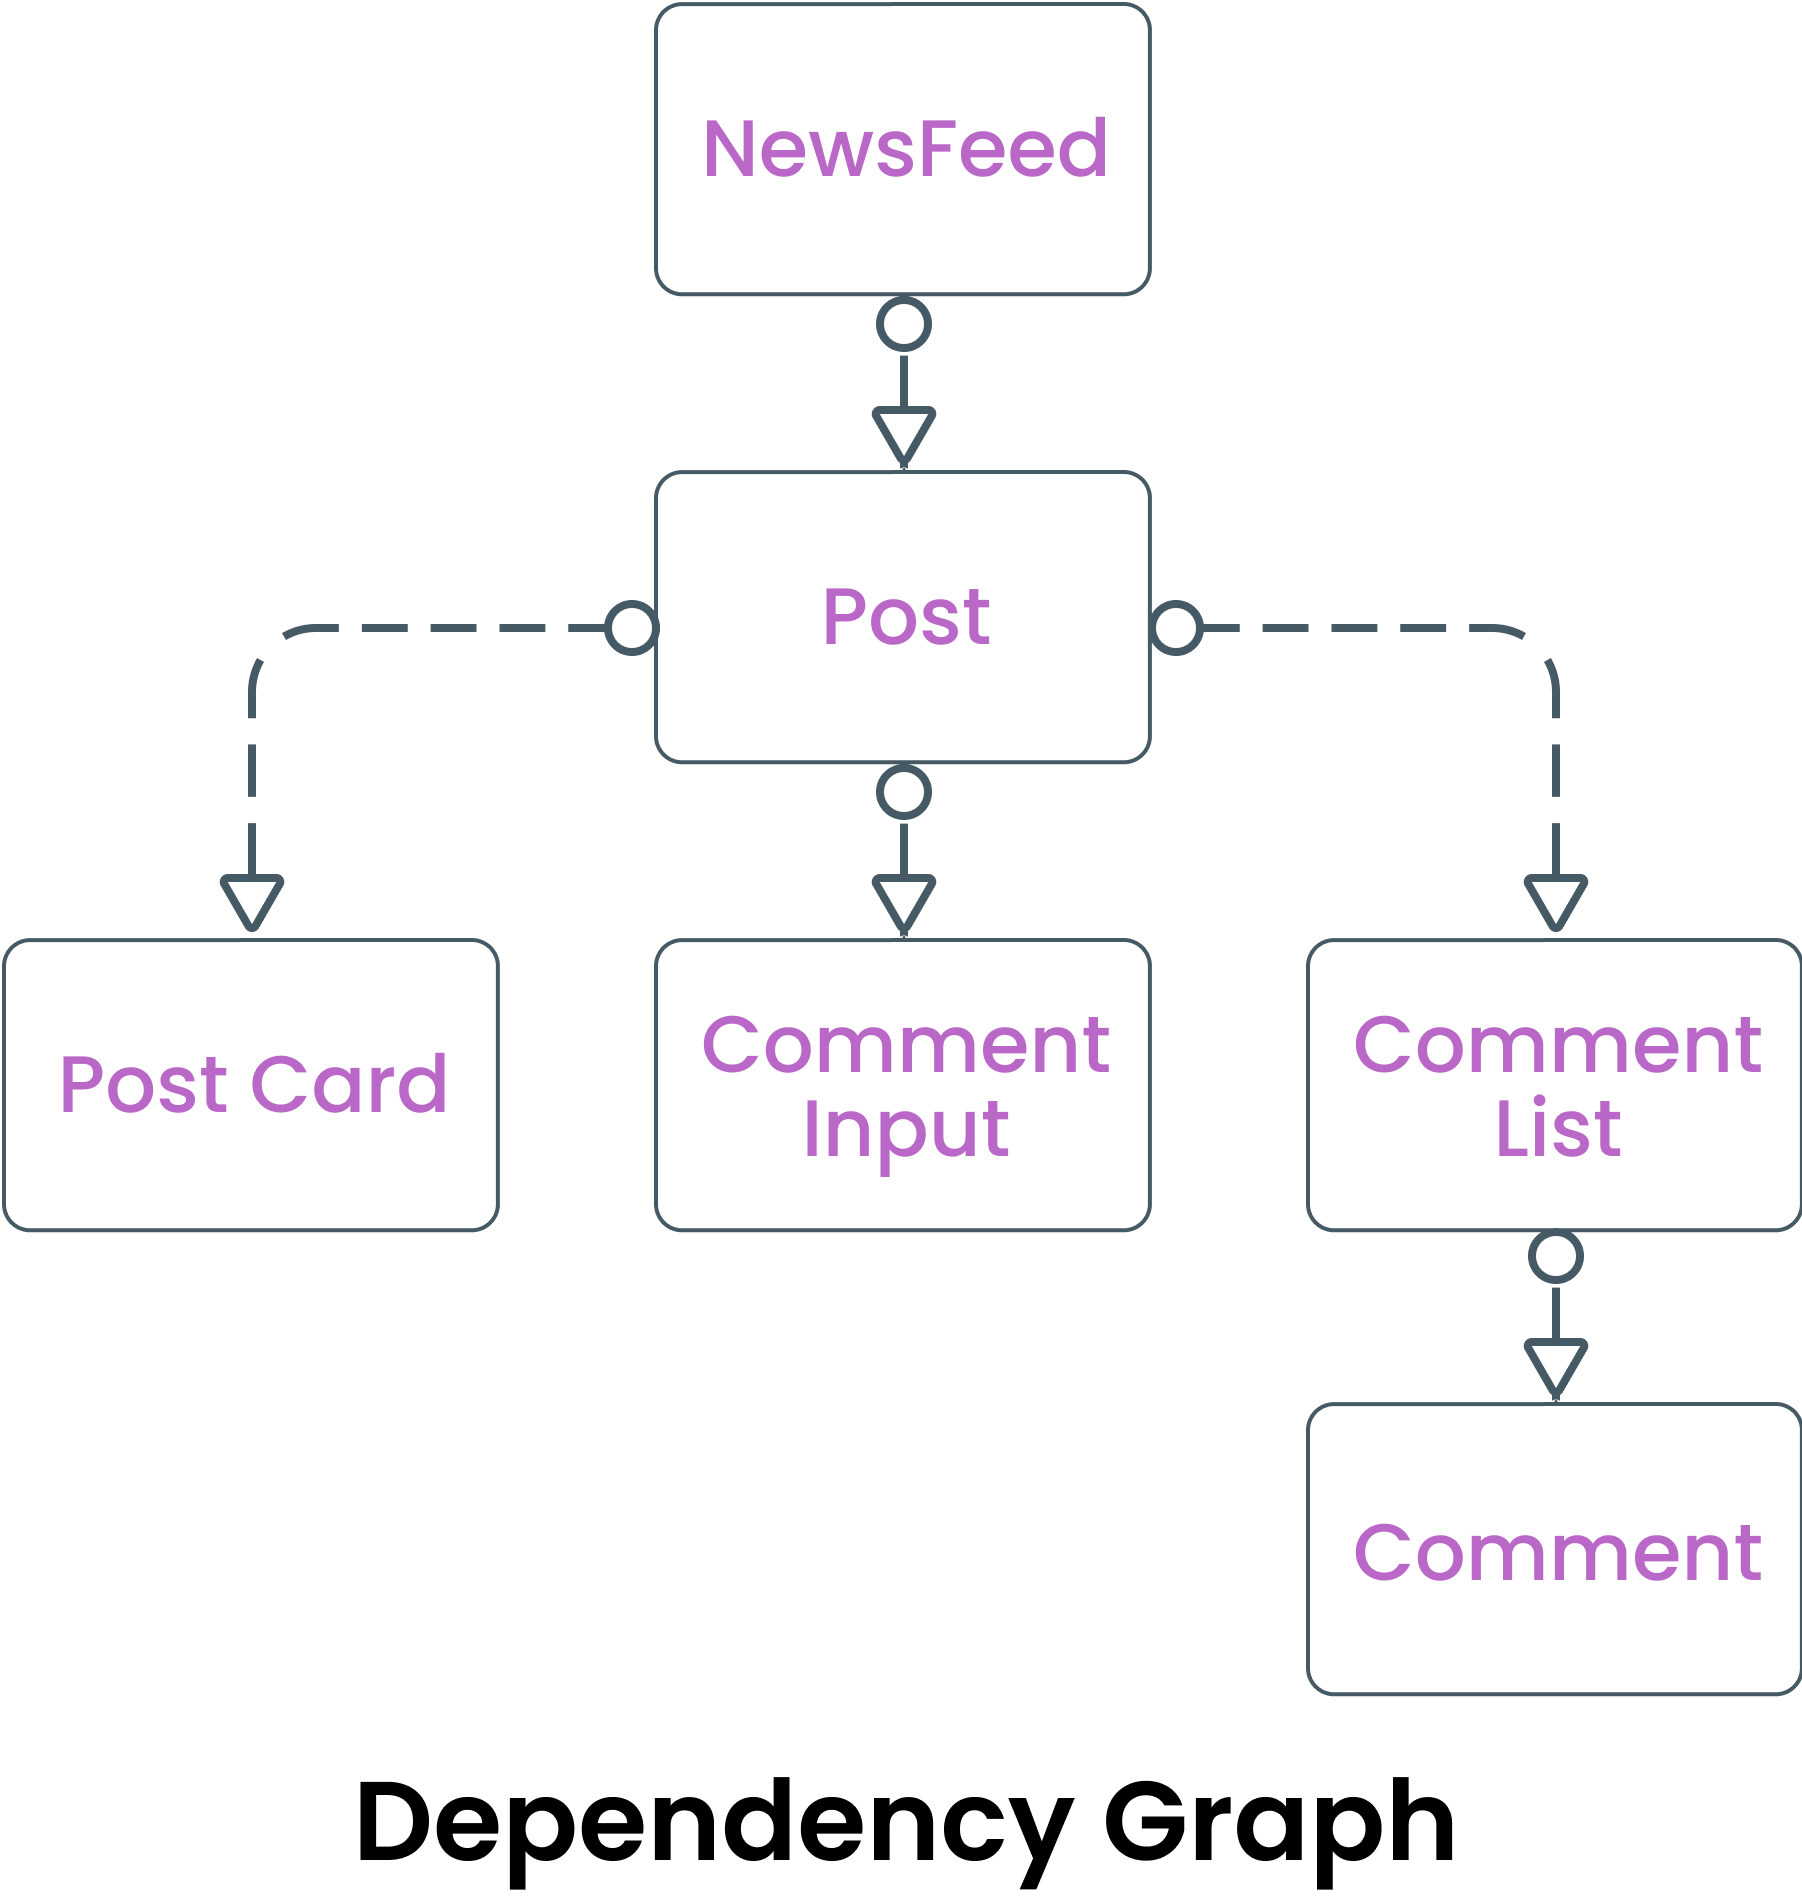
[2] Dependency Graph
The second point is the dependency graph or the component hierarchy, which is a stage in which we focus on illustrating how the components relate to each other, and how a component passes data to another one. It's also useful to highlight the fetching points.
As shown in the below image of the components' hierarchy of the Facebook newsfeed example, we selected the newsfeed to be our main fetching point, after that the data can propagate to the other components which we will discuss in detail later in the Data-Store section.
[3.3] Data Entities
Data entities of the components refer to the internal state of the components. The concept of the state is a common concept that's used by most of the popular front-end UI frameworks and libraries such as Vue, React, Angular, etc.
Even though the state is a popular notion, determining what data to add to the component is a vital stage, and there are several best practices and aspects to consider to assist you in designing this step optimally:
Best Practices:
Each component should have its state, allowing multiple instances to coexist on the same page. The state of one component instance should not affect the state of another component instance.
The state should contain only the data that may change over time during the lifecycle of the component which most of the time will be a result of the user interaction.
The fewer the fields you have in the component state, The easier your component to be understood and read, So make sure to reduce the number of state fields needed.
If a component has multiple subcomponents, it is preferable to keep the state at the top level and create the rest of the subcomponents as pure and stateless.
Any state field that can be derived from another state/s should be omitted and not be part of the state. For example, if your component is rendering a list of items and you want to display a message when there are no items to render, there shouldn't be an additional field like the
isEmptybecause it can be derived from the length of theitemsfield.
Note:
It's better to use TypeScript notation to describe the data entities to easily define all the fields and their types which will help in a better understanding of the state.
Example:
Here's an example of the Data-Entities of the Facebook newsfeed we mentioned in the above example:
type Post = {
  id: string;
  date: number;
  comments: Array<Comment>;
  content: string;
  media: Array<Media>;
  author: {
    id: string;
    origin: string;
    username: string;
    ..
  }
}
type Comment = {
  id: string;
  date: number;
  authorId: string;
  content: string;
  media: Array<Media>;
}
type Media = {
  type: string;
  url: string;
}
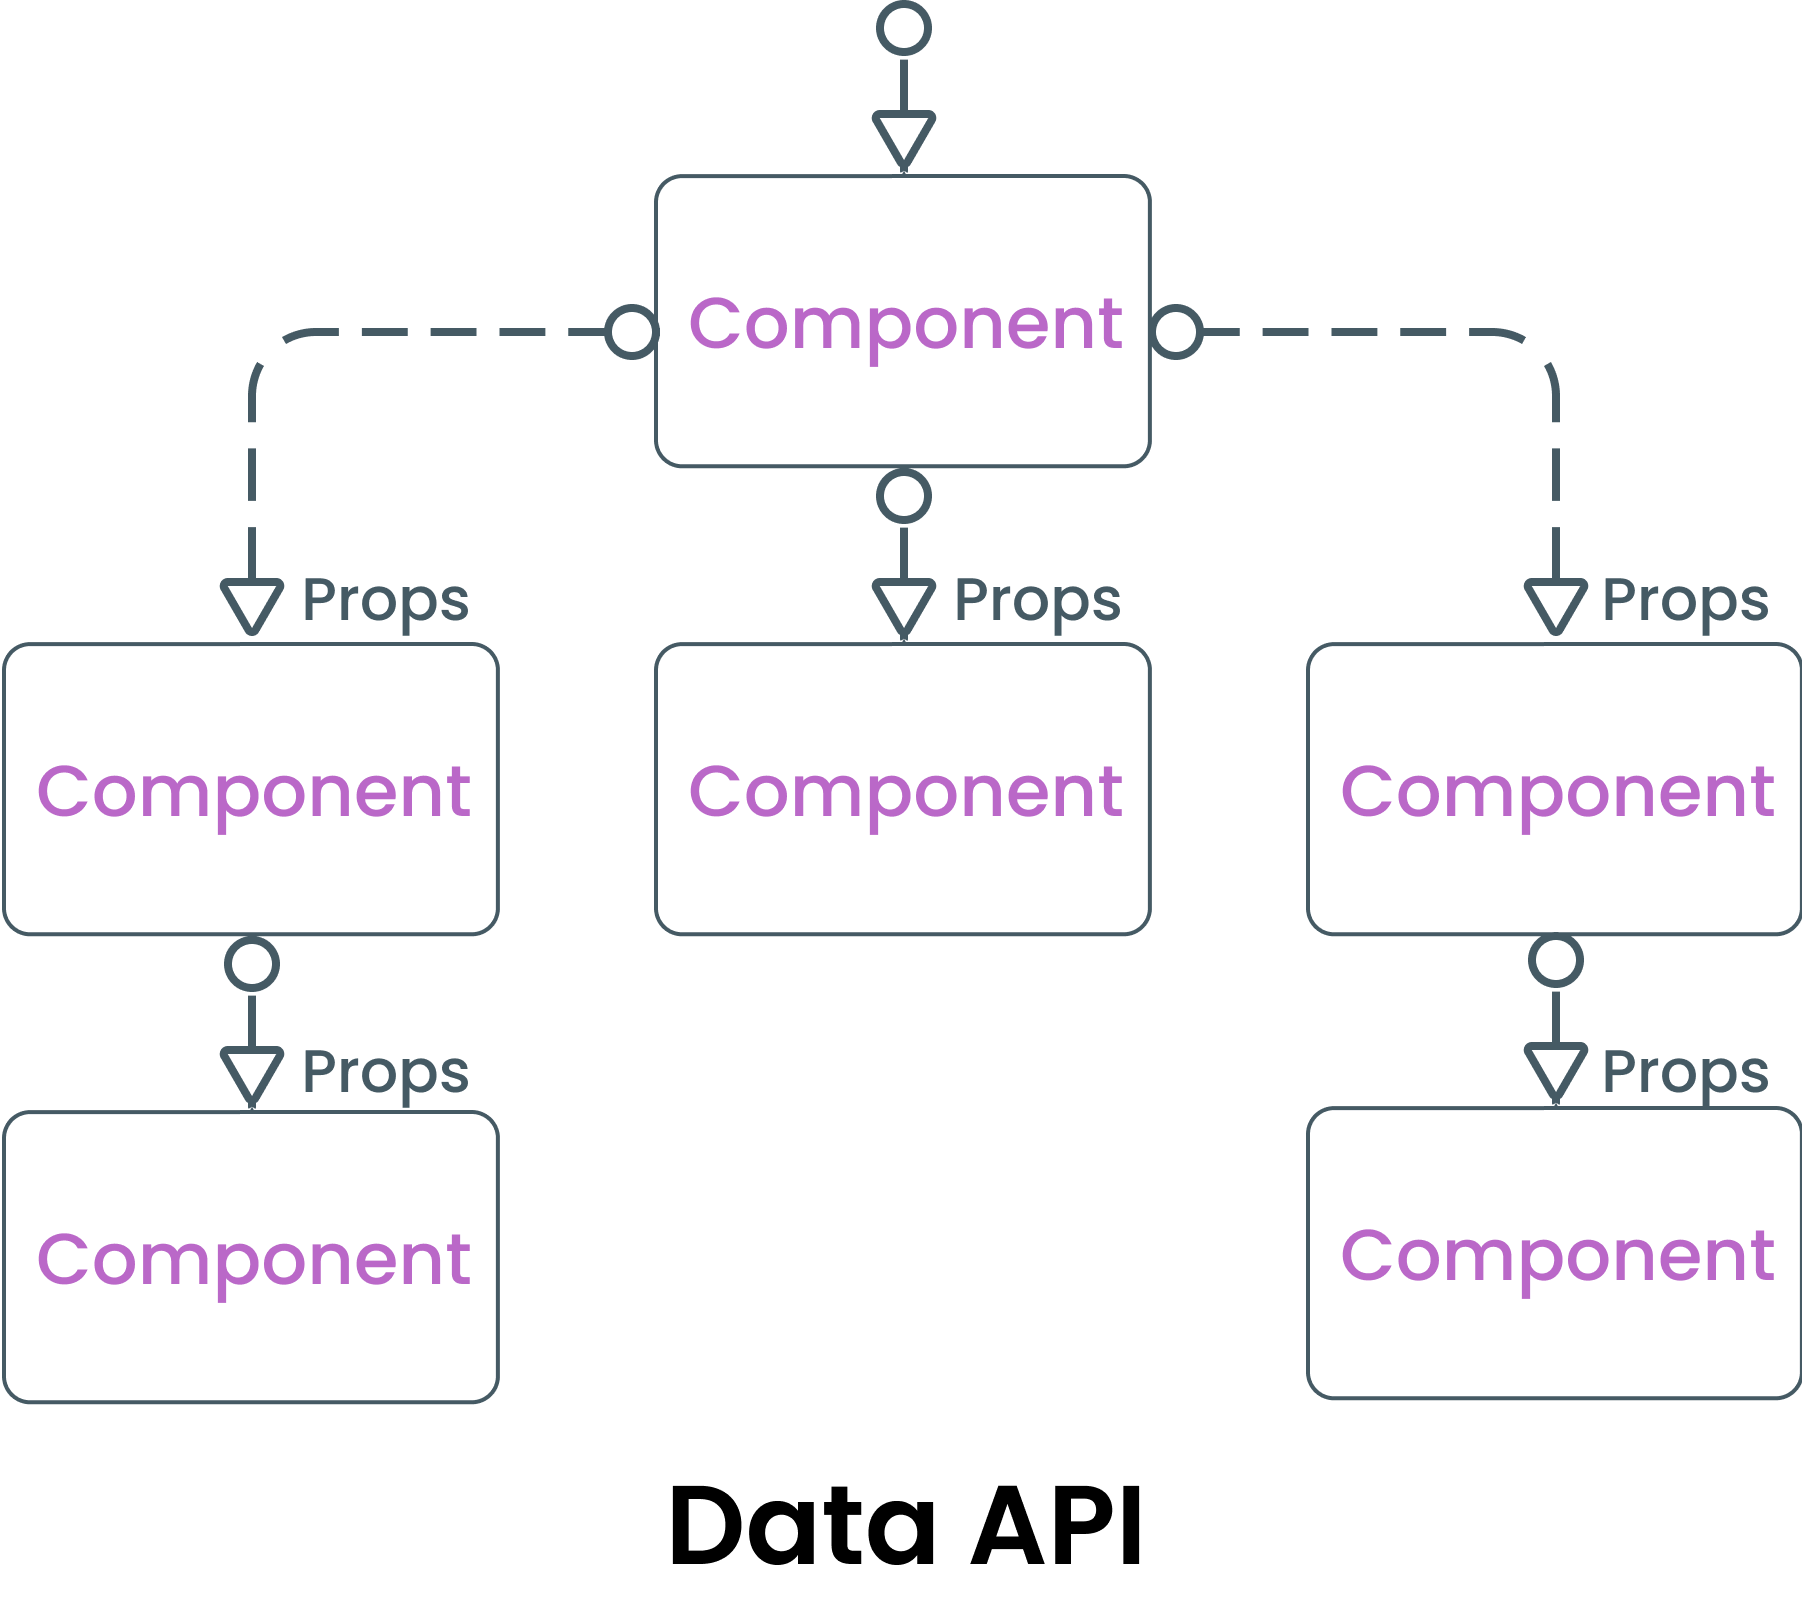
[3.4] Data API
The main idea behind the components is to be reusable and abstract. So we can use them in different pages and scenarios without any need to know how they work internally before using them.
Mainly, we satisfy this abstraction by having configuration options (Props) which will be exposed to other developers to control the component behavior.
Best Practices
Although the props are a popular concept in all modern frameworks and libraries, deciding what data to pass to the component is an important step, and there are several best practices you have to follow such as:
[1] Design Data API that follows the Open–closed principle
Open closed principle means that software entities (classes, components, modules, functions, etc.) should be open for extension but closed for modification - Wikipedia
[2] Another point to think of in designing the Data API that is the component you are designing is a part of a UI library. If yes, should we add props to customize the appearance of the component?
Also, how can we enable the user of the component to customize its appearance?
There are multiple ways to handle it:
Content Distribution API such as
<slot>in Vue or Composition in ReactConditional Props which are flags to control the appearance based on them
Class names and styles props which allow users to inject class names and styling attributes to inner DOM elements
Next Steps
So far we have covered the first four items from our framework that we will follow in any frontend system design problem, At first, we discussed the general concept of system design, passed by discussing the best practices for component architecture, designing the state of components and ended up by managing the data API.
In the next part of this series, we're going to continue covering our main framework item and add different examples and case studies of famous systems that we use every day. Stay tuned.


![JavaScript Patterns [Ch.2 | Part 2: Essentials]](/_next/image?url=https%3A%2F%2Fcdn.hashnode.com%2Fres%2Fhashnode%2Fimage%2Fupload%2Fv1622488770944%2FxKP0gbUK3.jpeg&w=3840&q=75)